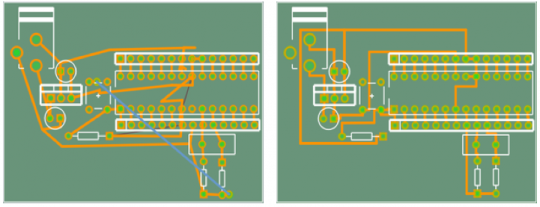
At last, a new release of Fritzing. Sorry it’s been such a long time since the last one–partly this is because there is no full time Fritzing staff (we all have to work for a living), and partly because I had the mistaken notion that I knew a fast way to implement an autorouter. But let’s go straight to the before-and-after:
The spiders-on-drugs image on the left is from Fritzing 0.4.3; the image on the right is from Fritzing 0.5.0, and they are each the result of autorouting the barebones arduino example. The one on the left took 30 seconds on a 2.80 GHz dual-core laptop, the one on the right took 3 seconds (yes, on the same machine). This video might make the difference clearer:
Why should I care?
If you are still gamely reading at this point, and don’t know what an autorouter is, I commend your courage, and will now attempt a definition. Once you’ve placed your parts and wired them up in breadboard view or schematic view, and you’re ready to make a pcb, you’re faced with a new task. This task is to draw out or route the electrical circuit–the connections between parts–in copper on your pcb. The orange-colored lines in the above images represent copper routes (also known as traces) on a pcb (green), where the white shapes represent the outlines of parts. Routing can be done by hand, but it can be tedious and tricky (though some people find it enjoyable, like doing a puzzle). An autorouter is a piece of software than can do the routing task for you, and some routers are very sophisticated–able to handle millions of connections. Fritzing’s new router is not the brightest star in the galaxy, but as you can see from the two images, the new router is not so dim a bulb as the old one.
Some background
Here are the details on the new router:
- It's a "manhattan" router--all new traces will be drawn at 90 degree angles. If you draw your own non-manhattan traces, the router will respect them, but you will probably make the routing job more difficult.
- It only takes a finite (and usually short) time for the router to determine whether it can trace a path between two points (no more waiting for endless futile line-probes).
- DRC (overlap checking) comes for free, giving clear feedback about what's overlapping, so the old crazy DRC code has been replaced.
- There is a rudimentary rip-up-and-reroute feature, meaning that if the router can't successfully route the whole board, it will automatically try routing again with a different ordering of connector pairs. This is usually quite speedy, and you can limit the number of retries: the router will keep the best result.
- As before, when drawing a trace fails, the router will attempt to place a jumper. The new router's jumper placement code is much improved over the 0.4.3 code.
- The router does not guarantee a shortest path when routing between two points.
The new router–like the rest of Fritzing–is a work in progress. You will probably have to do some tidying up after it runs. However, it’s already such an improvement over the previous that we decided not to wait any longer to release it. Here’s what’s still on the to-do list:
- Placing vias in double-sided routing.
- More intelligent rip-up-and-reroute strategy.
- More intelligent overall routing strategy.
- It misses some routes that it should find.
- Some traces violate DRC.
- Running the same autoroute twice in a row won't necessarily give the same result.
Despite the to-do list, we think you’ll be pleased.
Cheers,
PS. For those of you interested in the technical details, the new router uses a “tiled” data-structure. The technique was invented by John Ousterhout, and in fact Fritzing uses a modified version of the basic corner-stitching code from Ousterhout’s Magic VLSI Layout Tool. I’ve also incorporated ideas for improvements from a paper describing the Contour router and from another paper describing an ECO router.
In general, tile-routers are more complex than maze-routers, but I felt that a tile-based approach was suited to Fritzing because we don’t enforce a grid. It was also much easier to get my head around tiles than steiner-tree approaches (see a random sample of the latter). In theory, tile-based routers scale up better than maze routers because the number of tiles doesn’t expand so quickly as the working area increases (on the other hand, maze routers do guarantee a shortest path between connections). You also get some freebies with tile routers: the DRC and jumper and via placement are all variations on the same underlying code.
Four new books are making intensive use of circuit layouts created with Fritzing:
“Arduino: Praxiseinstieg”, by Thomas Brühlmann (mltp, German)
“Beginning Arduino”, by Michael McRoberts (Apress)
“Building Wireless Sensor Networks”, by Rob Faludi (O’Reilly)
“Praxisbuch Arduino”, by Ulli Sommer (Franzis, German)
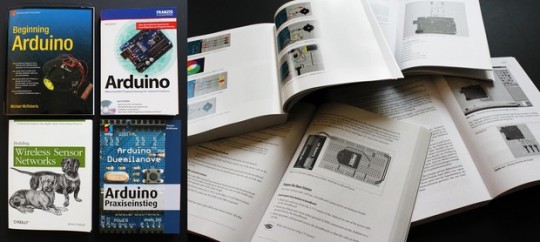
They are using breadboard diagrams, schematics, and part graphics to illustrate examples and guide the learner throughout the book. Some even offer the related Fritzing .fz files for download from their website.
We’re very proud to see Fritzing becoming a de-facto standard for documentation and teaching!
P.S.: Unfortunately, not all of them are making fair use–one forgot to reference Fritzing. This is required by our CreativeCommons license, and we think that’s the least a publisher can do when building on our work!
Comments from the old Blog:
- Thomas O'Brien # 30. Jan. 2011, 17:15
I have the "Wireless Sensor Networks" book, and have started reading it. I like the writing and explanatory style. It seems that just about everything is there to help me get going with a wireless network application. Now if Fritzing Fab would just get started...
- BobAnderson # 3. Feb. 2011, 05:25
I am sorry that some publishers have not referenced Fritzing --- most unfair, if not illegal. On the other hand, I found out about Fritzing from a reference (a live link actually) in the arduino.cc site. My plan is to use Fritzing for a while and if I find it as useful as I expect I will, I shall express my appreciation with a financial donation.
Fritzing has always been at home in many worlds. It’s a tool that is equally used by designers and artists who are looking for a simple way to bring their concepts to life, as well as by DIYers and makers of all kinds who love to play with electronics.
Two recent publications exemplify this diversity: The exclusive British design-trends magazine “Viewpoint” (issue 27) writes about Fritzing as an example of the implications that DIY has for business, and the French hobbyist magazine “Eletronique Pratique” (issue 356) has an 8-page feature introducing Fritzing in-depth.
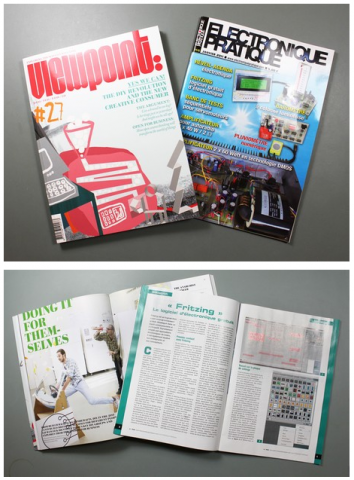
Thanks to Kai Wiechmann for photographing us for Viewpoint and thanks to Yves Mergy for the French tutorial.
Yeah, we know we’re a little bit behind on this.. Better late than never, you can now follow us on Twitter and become our friend on Facebook!
We figured there are so many small things happening around Fritzing that never make it into the blog. That’s what the twitter feed will be for. The Facebook group will be used for more general announcements – and to get to know you!


Can you spot any difference between the two images below? The one on the left is from Fritzing version 0.4.2; the one on the right is from version 0.4.3.
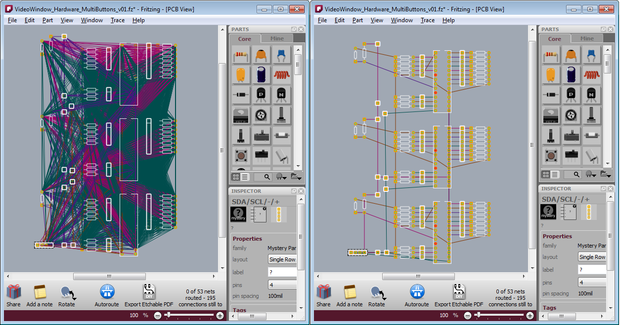
The difference is that in 0.4.2 a ratsnest displays every possible connection in a net. In 0.4.3 we show only one possible path–one set of connections–through the net.1 What is a ratsnest? If you already know, then feel free to skip ahead a couple of paragraphs.
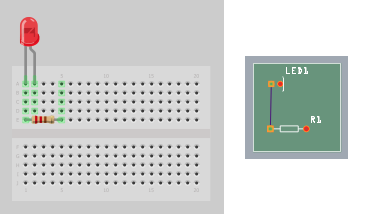
A ratsnest displays a set of connected connectors (a “net”), and it can suggest potential paths for routing between those connectors. In the simplest case, if you connect two parts (well, really two connectors) in breadboard view, a ratsnest in PCB view will show that those connectors are connected by drawing a line between them, and thereby suggest where you might draw a trace.This image displays a single net:
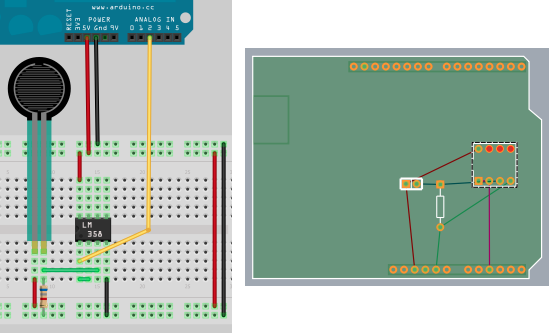
In a more complex case, we have multiple connectors connected, but not directly. Here, an individual ratsnest line can act as a “virtual wire”, drawing a line between two connectors that are electrically connected, but not directly wired to each other; for example, the connection between the resistor and the LM358. There are four nets in this image, as you can see from the four different ratsnest colors:
Starting with release 0.4.2 and continuing with 0.4.3, we have reimplemented ratsnests in Fritzing. The overall goal was to make them more useful–more like an interface widget than a wire–by adding functionality and improving their diagrammatic quality. In 0.4.2, we worked on the functionality, and added a couple of features:
- double-click a ratsnest to create a trace between its connectors
- delete a ratsnest to electrically isolate its connectors 2
With 0.4.3, we have concentrated on the diagramming–you can see the results in the initial pair of images above. Clearly PCB and schematic view are more readable, and better suggest where you might want to draw your traces. Another change is that in 0.4.2, as you drew traces between connectors, ratsnest lines would dim to let you know that that connection had been routed (directly or indirectly). In 0.4.3, routed ratsnest lines simply disappear (reappearing as necessary as traces are removed).
This leads us to another difference between 0.4.3 and prior versions: “jumper wires” are now obsolete. Their purpose was to show unrouted connections, which is what ratsnest lines are now doing. (Note that jumper items are not obsolete, just jumper wires–the former are basically a pair of connectors with nothing in-between, the latter was essentially a Fritzing UI construct).
There are two pleasant side-effects with the new approach. First, we no longer save ratsnests in sketch files, which means that Fritzing file sizes typically shrink anywhere from twenty to eighty percent. But do not tremble, your old Fritzing sketches are completely compatible with 0.4.3 (though the old ratsnest lines and jumper wires will be replaced by new ratsnest lines), and if you save the file back out, only its ratsnest and jumper wire elements will change. The second side-effect is that since the program is no longer keeping track of so many objects, there’s been a noticeable improvement in Fritzing performance. If any of you were driven to use the “speed hack” in Fritzing 0.4.2, Fritzing 0.4.3 is that fast, or faster.
Cheers,
PS. Thanks to Jim Bollensée and Olmo Claessens for permission to use their sketch to illustrate the changes.